lördag 26 januari 2013

Dslr smartphone ir remote

This tuitorial does not have any direct connection to theater but it's smart and cheap and that's good enough.

Besides the ir sender we are gone build, you will need an iPhone or any other iOS device and an app called DSLR.Bot. DSLR.Bot is free and you can get it at apples AppStore. it works with most DSLRs with support for a ir remote. check the DSLR.Bot homepage for supported cameras

The ir sender has a very simple design. The parts needed is a headphone splitter and two 3mm 940nm irleds.


Here are the parts and tools required


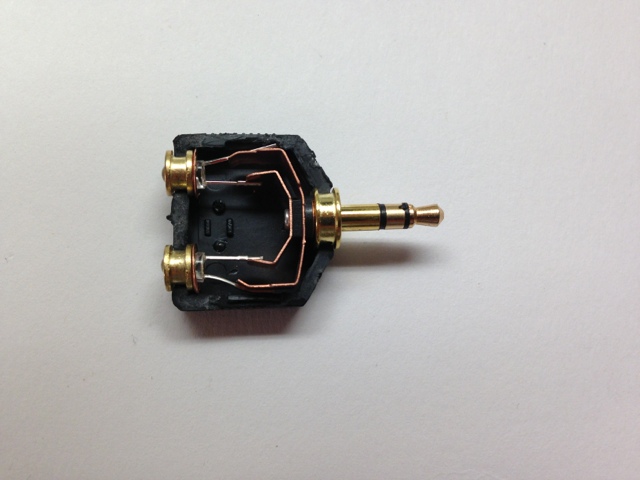
Pry open the splitter with a knife

Cut away the earth connections and cut the spring part for L and R. They need to be cut so you can fit the led in the casing. 


Cut the ir leds legs so they fit in the casing, about 10 mm should be fine. Anode on led1 should be connected to the cathode on led 2. Led 1 cathode to led 2 anode and solder it all together.

Put it all back in its case and glue it together.


The final result


DSLR.Bot homepage:http://www.dslrbot.com/

måndag 14 januari 2013

The Artnet Node Project.

For a couple of years ago i stumble on a project by Simon Newton that used a router and a usb dmx interface to create a Artnet node with a single universe output.
recently i found another project witch used a Arduino and a ethernet shield to make an artnet node. A couple of months ago i got an very small router from dealextreme wich is called TP-Link wr703n . when i was looking for information how to flash the router with english firmware i realized that it was could be possible to make very neat artnet node. It is possible to install a custom linux build to the router and install The Open Lighting Architecture (OLA) and connect a usb dmx interface to the usb port of the router.


some of the great features with wr703n

  • small (5,6 X 5,6 cm)
  • hackable
  • low power
  • has a usb host
  • cheap (22$ inc shipping)


the only bad thing is the Chinese firmware.

my approach
first i need to install openwrt.
how to do that this tuitorial seems to be great
then i need to install ola i will try follow this guide
will also use the router artnet page

If i will get this to work can make a tutorial.


lördag 12 januari 2013

Tinker Bell! the wireless dmx fairy


One of my most recent projects is creating a dmx controlled wireless LED. The LED is actually acting as Tinker Bell in the play Peter Pan and Wendy. the play had it´s premier at Stockholms Stadsteater in the middle of december 2012. the idea was to make a small battery powered wireless dmx LED driver. first i had an idea of using a Zigbee solution. but after some thinking I realized that i needed i wireless solution that both I and the technicians at the Theater was familiar with. finally i came up with a design using a wireless DMX module from Lumen Radios OEM series. i Made the LED driver and DMX decoder of a Arduino nano with a max 485 and a mosfet to drive a 3w LED. this was soldered to a PCB also containing a status led and a mode switch for the WDMX card. i made some mistakes along the way one was the choice of the LED was a bit too late and should have been done earlier in the design process. The choice of powersupply circuit and LED driver design was dependent on the choice of the LED. as a result of this the PCB design i came up did not exactly match the final design of the fairy. thats why i will not publish the actual plans here because i had to modify them to work. If some shows any interest i can publish the final modified schematic and arduino code. Theese module was then supplemented with a strobe follow spot that was acting as Tinker bell when she was flying. The final power source was a 10.8 volt RC battery. The original idea was to use a 9volt battery but it run out of juice to fast.

the finished pcb with the wireless dmx module underneath.  The White Cable is part of antenna. As you can see there are some modifications made on the pcb.


a bunch of tinker bell modules ready.

Simplest DMX interface!

There are many usb to dmx interface on the market and they are very cheap but if you want to make your own you could make it even cheaper. This interface will be related to the open DMX usb interface.
It will be supported on windows, NOT on osX and i have not tried it on linux.
software that supports open dmx will support this interface.

It is possible to make it with only three parts. i will not make a step by step tutorial but its not hard to make it.

First we need a usb to rs323 module. this module needs to have a FTDI ft232RL chip on it. The Module comes in many different shapes and sizes, there is also usb cables with a chip built in the connector.
the cheapest i can found cost 7 dollars including shipping at aliexpress.com

some picures of ftdi modules:

or

or

then you will need a rs232 to rs485 IC to convert the serial output from the ftdi module to dmx/rs485. I have used max485 or SN75176. you could get them for a couple of dollars or even cheaper.


At last you will ned a 3 or 5 pin female XLR connector.

Schematic:


software

drivers for the interface can be found at ftdichip.com

Ideas of changes of the design

you could leave pin1 not connected and connect pin 2 to ground.
pin1 on the max 485 is receive and pin 2 is receive enable. This interface can not receive dmx any way so thats why they are not needed.

happy soldering!


First Post......


The idea behind this blog is to share my constructions and ideas witch i do on almost a daily basis at different theaters and stages.
i will post tutorials on how to make some of the electronics i construct for the theater. I will share ideas on projects.


My name is Gustaf Gagge and i have a background as a light operator/programmer and video tec but i do special electronics and solutions for different shows.

well enough about me here comes the first posts......